
Recently, I presented a workshop titled, "Left Vs. Right Smackdown" - Organizing your writing with your left brain so your right brain can be more productive. Too often, that poor right brain struggles to keep all of the details straight, thus hindering its productivity. For the next few weeks, I'm going to take the nuggets from that workshop and teach you how to create spreadsheets, or at the very least give you ideas on how to organize into three-ring-binders if you haven't quite gotten the hang of the 21st Century.
For the spreadsheet terms I'll be using, please refer to "Spreadsheet 101" at the end of this article.
In "Organize Yourself as a Writer" I'll cover three aspects:
- Before you begin - CLOCK IN!
- All-In-One-Plotting (Don't let this scare you if you write seat-of-the-pants. It's only to help you keep all of your thoughts in one place)
- Manuscript Tracker
(Figure 1)
 Figure 1
To set up the grids:
- Highlight Row 6 to Row 22, Column A to Column I
- Click on Borders in your spreadsheet program and click All Borders (the diagram with four squares.)
- Drag Column G (see "Spreadsheet 101" below) to be able to accomodate a longer line of text. It will all make sense once you fill in the Log.
Once you have your spreadsheet looking similar to mine as far as grids, add the current date and time under the title of your sheet, WRITING LOG. Then you can refer to this whenever clocking in.
- Click in cell below title (Row 2, Column A)
- Go to the formula box and next to the small "fx" type =NOW()
- Right click the cell
- Choose Format cells in the drop down box
- Make sure Number tab is showing
- Choose Date
- Choose 3/14/01 13:30
To set up the DATE column to show the year (i.e. 01/07/09) (Figure 2):
- Right click
- Choose Format Cells in the drop down box
- Make sure Number tab is showing
- Choose Date
- Choose 03/14/01
 Figure 2
- Go to Row 7, Column B
- Right click
- Choose Format Cells in the drop down box
- Make sure Number tab is showing
- Click Time
- Click 1:30 PM
- Repeat steps above for Row 7, Column C
- Click in Row 7, Column D
- Go to formula bar above next to small "fx"
- type =C7-B7
- Now, to ensure the whole column sets up right, click in Row 7, Column D
- Hover mouse curser in lower right corner until a solid plus sign (+) shows up.
- Click and drag down the column to row 150. Now, every row will tally in the column.
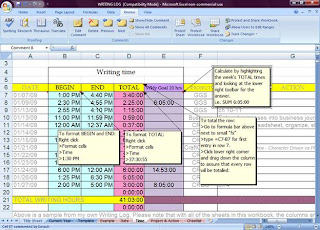
Figure 3
And finally, instructions on the Project and Action columns. (Figure 4)
- In the Project column, I list whatever I'm working on. I have code for my titles, (i.e. MP for Merely Players, GGS for God Gave the Song.) I also list if I've been on the computer all day doing research, (RES,) or taxes (TAX.) If I ever want to see how much I've worked on a particular project, I can use the sort data feature to alphabetize that column.
- In the Action column, I list exactly what I've done. (I.e. Chap 7, plotted book, called alpaca ranch.)
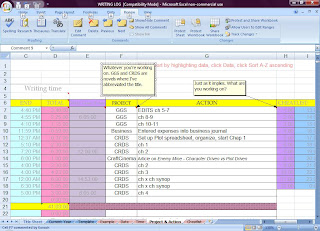 Figure 4
If you're ever audited by the IRS, your Writing Log will become your best friend. It shows that you are actually working at becoming a writer.
I've tried to lay out the instructions as clearly as possible. If something isn't quite right, you may comment to this post so others can benefit. However, if it's a technical issue, I'm not qualified for that. Also, if you use something other than Excel, I can't help there either.
I do hope I've at least sparked some ideas, helped to move you in the right direction, so to speak. Next week, I'll continue the workshop with the All-In-One-Plotting Workbook. This will take several weeks so I don't overwhelm you. There will be plotting techniques as well as organizational techniques in this worksheet. The good news is that there are no more formulas until we get to the Manuscript Tracker.
SPREADSHEET 101
I use Excel, but the following instructions should work for any spreadsheet program. If it doesn't, please use your help feature instead of calling me. Please. I beg of you.- WHAT'S A CELL? Any little box that makes up the grid.
- WHAT'S A COLUMN? Just like columns on a house, these are vertical (up and down.)
- WHAT'S A ROW? Just like the wheat rows in a farmer's field, these are horizontal (back and forth.)
- WHAT'S A SHEET? The part you see, the page you're working on at the time.
- WHAT'S A TAB? Located at the bottom of the sheet is a series of tabs that open up more sheets, typically three to start. You can add and delete tabs to your heart's desire by right clicking and choosing the option.
- WHAT'S A FORMULA? A more advanced function of spreadsheet usage. If you can learn to do simple sums, a whole new world will open up. Use the "help" feature to learn how to do math in columns and/or rows.
- CREATING A HYPERLINK: Right click on the cell or picture you want to link from. Choose "Hyperlink" in drop down list. Check "Existing File or Web Page". Click little arrow to browse your files and choose the one you wish to link to.
- FORMATTING CELLS TO WRAP THE TEXT: Right click on the cell, choose "Format cells", click "Alignment" tab, and check box that says "Wrap text."
- HOW DO I MERGE CELLS? You can merge two or more cells together (to create one big box) by right clicking in the highlighted cells, choosing "Format cells", clicking the "Alignment" tab, and checking "Merge cells".
- USING RETURN (ENTER) IN A CELL: To type a new line in the same cell, hold down ALT while hitting enter key.
- MOVING DATA FROM ONE CELL TO ANOTHER: Click on the cell, then move the curser until you see a small figure of four arrows pointing in four different directions. Click and drag to another cell. Caution: This will move all your formatting, too, including color highlighting and borders. If you want to just move the text, double click in the cell, highlight the text and cut and paste as usual.
- ADJUSTING SIZE OF COLUMNS AND ROWS: Click on the line in the border either on top for columns or on the left side for rows. Drag to the size you want.
- MOVING SHEETS: Click and drag the tab. It's that simple.
- DELETING, RENAMING, COLORING TABS: Right click and choose your option.


1 comment:
Kathy, you make it all sound so easy. Unfortunately most of it is in German.
Post a Comment